
This document will illustrate how to get started with the AIM Javascript API and give examples on how to get things done with it.
If you are looking for documentation specific to the host side of things, have a look FIXME.
Documentation for the core methods of the API can be found here, and CSS documentation can be found here.
Using the AIM API with its basic functionality is extremely simple. The following steps will get you on your way to having a buddy list on your page:
<div id="AIMBuddyListContainer" wim_key="asd32twe3vka_l15"></div>
Note: If you're a stickler for validation and the thought of adding the wim_key attribute to your page causes you chills, you can always define it in script as AIM.params.wimKey.
<script type="text/javascript" src="http://o.aolcdn.com/aim/web-aim/aimapi.js"></script><a onclick="AIM.widgets.buddyList.launch();return false;" href="nojavascript.html">Launch my Buddy List</a>That's it! Now you've got your own AIM client running on your web page.
Note: The "nojavascript.html" page will only be hit by people that visit your application with javascript disabled, and it is up to you to create for your site. Its not required, but it is a usability enhancement that will make you many friends in the accessibility community.
The "IM Me!" widget is a quick way to have visitors to your blog or website send you an Instant Message without having to launch a buddy list - with the added benefit of them only appearing online to you. Follow steps one thru four in the instructions for how to add the Buddy List widget to your page, and then add the following:
<a href="nojavascript.html" onclick="AIM.widgets.IM.launch('YourScreenName');return false;">Send Me an IM!</a>
Note: Change YourScreenName to the screen name you want people to IM - yours!.
When the user clicks the link, they'll see something like this, depending on the theme you are using:
The Presence Widget allows you to display the online status and buddy info of users you specify. Follow the first four steps of implementing the Buddy List widget, and then do the following:
<div class="AIMPresenceWidget YourBuddiesScreenName">YourBuddiesScreenName</div>Note: The element you use does not have to be a <div> - it can be any element you want. The only requirement is that you include AIMPresenceWidget and the users screen name (without spaces) as the class attribute. You can include as many Presence Widgets on the page as you like.
<script type="text/javascript">
window.addEventListener?window.addEventListener("load",AIM.widgets.presence.launch,false):window.attachEvent("onload",AIM.widgets.presence.launch);
</script>.AIMPresenceWidget {
text-indent:32px;
background-repeat:no-repeat;
background-position:left center;
height:32px;
font:bold 14px arial,verdana;
padding-top:5px;
width:180px;
border:2px solid #000;
}
.AIMPresenceWidget_offline {
background-image:url(aimpresence_offline.gif);
}
.AIMPresenceWidget_online {
background-image:url(aimpresence_online.gif);
}
.AIMPresenceWidget_away {
background-image:url(aimpresence_away.gif);
}
<script type="text/javascript">
function launchBuddyList() {
	AIM.core.addCallback(AIM.params.callbacks.listener.buddylist,"setTimeout(addIcon,1000);");
	AIM.widgets.buddyList.launch();
}

function addIcon() {
    var oBuddies = AIM.util.getAIMIDCollection(document.getElementById("AIMBuddyListContainer"));
    var i = oBuddies.length;
	while(i-- > 0) {
		var oAnchor = document.createElement("a");
		oAnchor.className = "YourClassName";
		var image = document.createElement("img");
		image.setAttribute( "src", "URLToYourImage.png" );
		oAnchor.appendChild(image);
		oBuddies[i].appendChild(oAnchor);
	}
}
</script>
Note: It's a good idea, though not required, to place the above javascript (without the script tags) in its own file and reference it from your document. This will reduce the size of your document and allow the user's browser to cache the script.
<a onclick="launchBuddyList();return false;" href="nojavascript.html">Launch my Buddy List</a>See the section above about implimenting the IM Widget.
The difficulty of making your own theme depends entirely on your skill level with Cascading Style Sheets. Our best advice if you are a novice with CSS is to dissect the existing theme style sheets, modifying values to see what they do and adding your own selectors. Example style sheets can be found here:
If you're already a CSS pro, have a look at the CSS Documentation for a list of the selectors the API applies to the elements it creates and have at it.
To use a theme that someone else has created, you'll need to define a couple of javascript variables in your document.
On the line after your reference to aimapi.js, add the following:
var baseResourceURI = "http://www.domainTheThemeIsOn.com/themeDirectory/";
AIM.widgets.buddyList.appearance.styleSheetURI = "http://www.domainTheThemeIsOn.com/themeDirectory/themeCSSFile.css";
The baseResourceURI tells the API where to look for images, sounds, etc. AIM.widgets.buddyList.appearance.styleSheetURI tells the API what CSS to use for the Buddy List widget. If you are using the IM Me or Presence widgets, you'll use the following variables instead, respectively:
AIM.widgets.IM.appearance.styleSheetURI = "yourStyleSheet.css";
AIM.widgets.presence.appearance.styleSheerURI = "yourStyleSheet.css"
Note: It is important that themes contain all of their resources in the same directory so the API can find them. This includes CSS files, sound files and image files.
Follow the steps outlined in How do I use a Theme?, replacing baseResourceURI and AIM.widgets.widgetName.appearance.styleSheetURI with the following:
var baseResourceURI = "http://o.aolcdn.com/aim/web-aim/minima/";
AIM.widgets.widgetName.appearance.styleSheetURI = "http://o.aolcdn.com/aim/web-aim/minima/minima.css";
var baseResourceURI = "http://o.aolcdn.com/aim/web-aim/palo-alto/";
AIM.widget.widgetName.appearance.styleSheetURI = "http://o.aolcdn.com/aim/web-aim/palo-alto/palo-alto.css";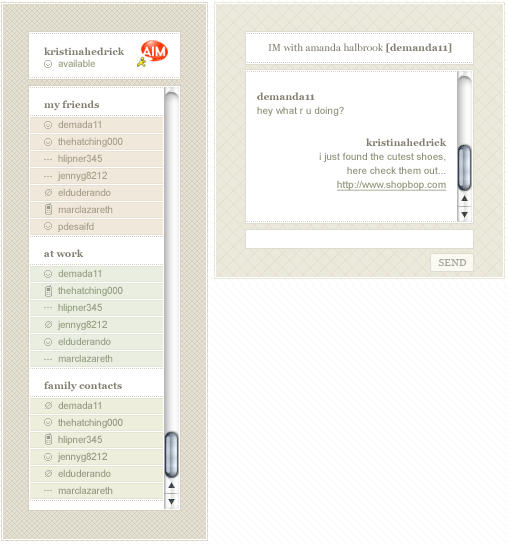
var baseResourceURI = "http://o.aolcdn.com/aim/web-aim/urban-legend/";
AIM.widget.widgetName.appearance.styleSheetURI = "http://o.aolcdn.com/aim/web-aim/palo-alto/urban-legend.css";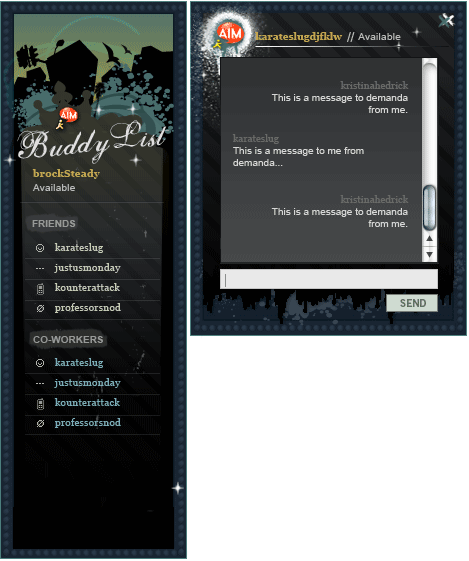
Note: There are two versions of XOXO. One uses 24-bit PNGs, which MSIE 6 doesn't support. So, there is a version with solid backgrounds for that browser.
if(navigator.userAgent.indexOf("MSIE 6") > -1) {
	var v = 2;
} else {
	var v = 1;
}
var baseResourceURI = "http://o.aolcdn.com/aim/web-aim/xoxo_v" + v + "/";
var AIM.widgets.widgetName.appearence = "http://o.aolcdn.com/aim/web-aim/xoxo_v" + v + "/xoxo_v" + v + ".css";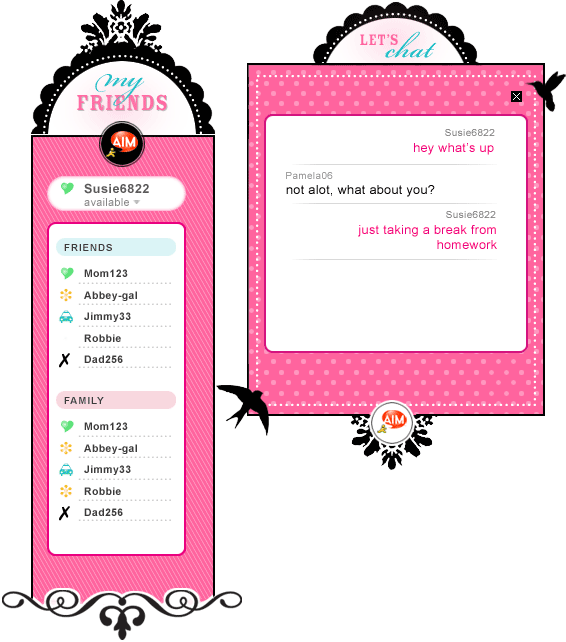
Note: The default theme is styled to look similar to AIM 6.0. No changes need to be made to use that theme.
If there are specific screen names in a buddy list that you want to manipulate programatically, you can get a reference to them with the AIM.util.getElementsByAIMID API:
var screenNameCollection = AIM.util.getElementsByAIMID("ChattingChuck",document.getElementById("AIMBuddyListContainer"));
The above will provide you with a node reference to every instance of "ChattingChuck" in the Buddy List, allowing you to do whatever you like.
Note: Every user appearing in a buddy list will also have their screen name applied as a class name, so if you are simply wanting to change the visual styling of that screen name, you can do so just with CSS:
.ChattingChuck { color:red; }
This will cause ChattingChuck's name to be displayed in red everywhere it appears in the buddy list.
What follows is a breakdown of what the API does between the time a user clicks the launch button until they see their entire buddy list render. This is intended to aid you in better understanding what's going on behind the scenes so that you'll be better equipped to extend the API.
When AIM.widgets.buddyList.launch() is called, a series of checks are made to ensure that everything the API needs exists in the document. A check is made that the AIMBuddyListContainer element exists, and that the user is in a browser that the API is known to support. The API does not block users in unsupported browsers, it simply informs them that they may not get the full blown experience.
Once these checks are made, the API makes a call to AIM.transactions.getToken. This method takes a subscription list as its argument, which tells the host what events we are interested in receiving notifications about. The buddy list takes advantage of all available events, so we'll call it as such:
AIM.core.subscriptions = "buddylist,presence,im,typing";
AIM.transactions.getToken(AIM.core.subscriptions);
AIM.transactions.getToken sets up the data object that will be passed to AIM.core.requestData. Properties of this object include the URI we'll be making a connection to, the type of transaction we are making (getToken in this case) as well as the event list.
AIM.core.requestData takes that object and uses it to create a <script> element that points to the URI we've specified. All of the URIs take a standardized set of arguments that tell the host how to return data back to the calling application. In the case of getToken, these are:
AIM.core.acceptData.Note: Using the basic functionality of the API, you are never required to know these URLs or define these parameters.
AIM.core.requestData always appends an additional argument named "r" to requests it sends up. This is known as the "responseID" and is echoed back in the json response from the host. This is used by the API to tie requests to responses, and to clean up used connections. The API always passes an integer, starting with 0 and incrementing for each subsequent request, but the value of "r" can be anything at all.
The value of "r", in the API's case, is always the current length of the AIM.core.AIMData array. This object stores two properties for each index. The first is a pointer to the script element that AIM.core.requestData creates, and is referenced as oScript. The second is a copy of the data object we set up in AIM.transactions.getToken, and is referenced as objData.
When the host responds to AIM.core.requesData's request, it will be routed through AIM.core.acceptData. All responses for the API are sent to this function, which then determines where to send the data based on the value of AIM.core.AIMData[requestId].objData.type. In this case, that value is "getToken".
Callbacks for responses are defined in the AIM.params.callbacks object. For the default API, getToken's callback is defined as AIM.callbacks.getToken. AIM.core.acceptData looks this up, and passes the host's json response to that function. More than one callback can be defined, and AIM.core.acceptData will call them in order, passing the response to each.
Note: Adding a callback is as simple as AIM.core.addCallback(AIM.callbacks.getToken,"myNewCallback");
Note: You can overwrite a callback object completely like this: AIM.params.callbacks.getToken = ["myNewCallBack"];, which will result in only myNewCallback being called by AIM.core.acceptData.
In the case of AIM.transactions.getToken, the API will pass the response to AIM.callbacks.getToken. This function will check the response code that the host sent back to the calling application. If the response code is a 200 (Success), AIM.callbacks.getToken will make a call to AIM.transactions.startSession. If the code is a 450 (User did not grant the rights to the application to perform the action) or a 401 (user is not authenticated), it will call AIM.core.createAuthWindow, passing a URI that came in the response. The URI is opened in an iframe.
The login screen is hosted on api.screenname.aol.com, and is SSL. When the login completes, the Screen Name Service (SNS) will communicate this to the calling document by setting the hash of the parent document to one of the following:
While the authentication iframe is alive, the API runs an interval that checks for these identifiers on the url. Once one is found, the iframe is hidden and specific actions are taken based on their values. If #AUTHDONE is found, the application makes a second call to AIM.transactions.getToken, and will this time receive a token from the host that it can start a session with. If #AUTHCANCEL is found, the iframe is removed and no further action is taken.
Now that the application has a valid token for the user, it can start a session with AIM.transactions.startSession. This function operates much like AIM.transactions.getToken, setting up the same sort of object to pass to AIM.core.requestData. In addition to the arguments passed to the getToken URI, startSession also passes the following:
AIM.transactions.getToken was initially called.
Once AIM.core.requestData is called from AIM.transactions.startSession, the path is identical to when AIM.transactions.getToken was called. AIM.core.acceptData will receive the response and send it to the appropriate callback; in this case, AIM.callbacks.startSession.
If the response from the host is a 451 (Permission denied), the API will alert that the user's account is not permitted to use the API (for example, an AOL account marked as a child's account) and exit.
If the response from the host is a 450 (Rights required), the API will follow the same path it did when getToken informed it that the user wasn't authenticated. An iframe will open with a URI specified in the response, in this case asking the user for permission to access their buddy list.
Again, the API starts an interval that waits for the document in the iframe to set an identifier on the URL. These are:
If #CONSENTCANCEL is found, the iframe is removed, the API exits and no further action is taken. If #CONSENTDONE is found, the iframe is removed, and the API makes another call to AIM.transactions.startSession.
The transaction should now return a 200 (Success). With that response their will be a URI specified for the API to listen to for event notifications that it has subscribed to. The API makes a call to AIM.core.destroyListenerObject, passing true to specify that it should create a new one. This will create a <script> element that will open a connection to the URI specified in the response, which the API will hold open until the host has something to say to it.
Note: In Microsoft Internet Explorer 6+ and Safari 2.x+, the listener holds its connection open for one minute. It then destroys the script element that acts as the listener and creates a new one. In Firefox 1.5+, the API must limit the connection to two seconds because that browser is currently incapable of processing more than one script at a time, blocking all other script connections until the first completes. For example, if the API is listening with one script element, requests from the client with other script elements will be blocked until the host closes the connection with the client.
Note: It is recommended that you always call AIM.core.destroyListenerObject(true) instead of AIM.core.createListenerObject() to ensure that multiple listeners aren't created.
Note: If using the basic functionality of the API (specifically the widgets) it is never necessary for you to create or destroy your own listener.
Since the API subscribed to the buddylist event, this will be the first thing that the API will be notified of. The user's buddy list will come through the listener pipe as one large json object. All listener events are routed through AIM.core.listen, and callbacks are registered for listener events the same way they are for requests.
When a buddylist event is received (identified in the json response from the host as json.response.data.events[eventIndex].type), it is passed to AIM.ui.createBuddyList (specified in AIM.params.callbacks.listener.buddylist), which walks over the response and builds the unordered list that will represent the buddy list, applying classes and behaviors.
At this point, the buddy list is fully rendered. When the API receives presence (someone signing on, going away, etc), IM or other event updates, the responses are passed to the registered callbacks and the buddy list is updated as needed.